Home Theater Design

Designing a home theater from scratch

As part of our new home construction, we built a dedicated home theater. Our previous home theater was built in a converted bedroom and, as such, was constrained by the dimensions (and other aspects) of the existing room.

While there are some minor constraints due to the location in the house (daylight basement) and adjoining rooms, the primary constraints limiting this new design are budgetary.

I went through several iterations on the theater design, and now that it is more-or-less done, I am very pleased with the results.

After my first few design iterations, I met with Dean Gainer of Sound Progression to review the design and get some pointers. final design reflects his feedback.

A photograph of the finished theater is shown below.

Room Dimensions

The first thing we needed to decide was the room dimensions. I had three key goals for this theater which impact this decision:

bullet

The room dimension ratios should be as acoustical optimal as possible.

bullet

The display system should be rear projection to move the noisy projector (and other equipment) away from the listening position and improve the quality of the image when the room lights are not all the way off.

bullet

The room should seat a minimum of six people using normal sofas (my wife doesn't like theater seating).

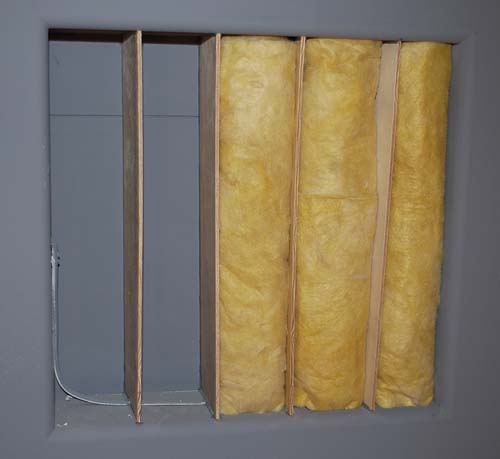
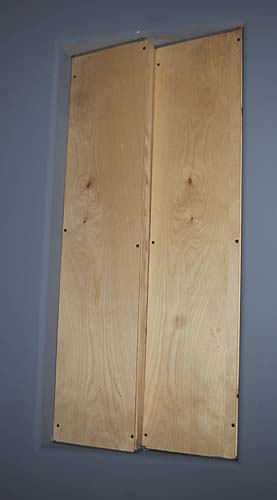
In average size home theaters and listening rooms, the axial resonances (frequency at which the wavelength of the sound matches the room dimension) falls in the first few octaves of the audible sound spectrum. These resonances cause significant peaks and dips in the frequency response as heard in the room. To minimize the impact of these resonances, the room dimensions (length, width, height) are chosen so that they are not equal or an even multiple of one another. This essentially spreads out the resonances so that one frequency (or narrow range) is not affected by resonances along more than one room axis.

I originally thought about building a room that had non-parallel walls. This would eliminate the strong axial resonances, at least along the width and length of the room (the axial resonance between the floor and ceiling would still exist assuming I couldn't use a sloped ceiling). After doing some research, I decided against this approach since rooms built like this tend to have poor imaging and are very hard to model. A rectangular room may have obvious bass resonance problems, but at least they are predictable and potentially easy to solve.

A number of researchers have attempted to determine the optimal ratio for a rectangular room. The consensus is that there is no "optimal" ratio, but a number of different ratios that provide good distributions of room resonances. I originally chose a ratio (1.0 : 1.6 : 2.33) proposed by L. W. Sepmeyer (Computer Frequency and Angular Distribution of the Normal Modes of Vibration in Rectangular Rooms, 1965). However Dean suggested I make the wall between the theater and projection room acoustically transparent, effectively making the length of the room considerably longer.

Larger rooms have fewer bass resonance problems because the modes are closer together in the audible frequency range. We're only increasing one of the room dimensions, but this is the most important dimension since this will make the bass response much smoother as we move forward and back in the room, giving us more flexibility in adjusting the seating positions.

The effect of room modes can be reduced by using low frequency absorption in the room. This absorption broadens the bandwidth of each mode and reduces its amplitude. Low frequency absorption can be provided by appropriate room construction and using acoustic treatments designed for this purpose (such as RPG Modex panels and ASC Tube Traps, or similar homemade devices). A properly designed room with these treatments will result in a much smoother bass response, but more bass energy must be provided by the subwoofers to create the same bass loudness in the room.

Increasing the length of the room also means that the rear wall is now a considerable distance from the speakers. This eliminates the rear room boundary from interfering with the front speaker response. Room boundaries can also have significant deleterious effect on frequency response smoothness. This is due to constructive and destructive interference between the direct sound from the speakers and the reflected sound from the walls.

The projector room can also now be used for room acoustic treatments without worrying about esthetics. And the subwoofers can be placed in ideal positions to more evenly "load" the room so the bass response is more even throughout the entire listening area.

The dimensions of the "theater" part of the room are 258" long, 178" wide, and 110" high. This room is separated from the projector room with a cloth partition. The length of the overall room is 442".

Reverberation

After considering room bass resonances, the most significant acoustical property of a room is its reverberation time. When a sound is generated in a room, it bounces around the room and eventually decays. The accepted definition of reverberation time is the time it takes sound to be attenuated by 60dB. In rough terms, this is the time it takes a loud sound to decay to inaudibility.

A room with a long reverberation time will sound very live, perhaps even to the point of having echoes if the room is large enough. Many church cathedrals or gymnasiums will have this quality. A room with a very short reverberation time will sound dead and lifeless - an anechoic chamber or an open field are probably the best examples.

There are many opinions about the optimum reverberation time for a home theater, but it is generally agreed that a reverberation time in the range of 0.2 to 0.6 seconds will work well. A longer reverberation time will make music sound more live, but at the expense of dialog intelligibility. Since movies are mostly about the dialog, I've designed the theater with a reverberation time goal of around 0.3 to 0.4 seconds. This is similar to my previous theater which worked very well.

Reverberation time is determined by the size of the room and acoustic dampening. Acoustic dampening materials attenuate the sound as it reflects off the surface. Every material used in the room provides some acoustic dampening, so the challenge is to choose materials for their esthetic value that also provide good acoustical properties.

For optimal sound, the reverberation time should be fairly consistent across the audible spectrum. It is fairly easy to absorb sound in the higher frequencies with materials such as carpeting, stuffed furniture, draperies, etc., but it is more difficult to match this absorption in the bass frequencies.

The reverberation time can be approximated using the following simple formula, which was empirically derived by Sabine around the turn of the century. It should be noted, however, that this formula is not very accurate for small rooms, and empirical measurements will be required to fine tune the room.

RT = 0.049V/Sa

where,

V = volume of the room in cu ft.

S = total surface area of the room in sq ft.

a = the average absorption coefficient of room surfaces.

Sa = total absorption, sabins.

The absorption coefficients of most building and acoustic materials are readily available. These are generally specified for six different frequencies (125Hz, 250Hz, 500Hz, 1KHz, 2KHz, and 4KHz).

I created an excel spreadsheet for my theater to estimate the reverberation time based on the materials and room treatments I am planning to use. The determination of room treatments was partially determined by plugging their acoustical properties into this spreadsheet to see their effect. The calculated reverberation time for my theater ranges from 0.25 to 0.4 across the audio spectrum (at least from 125Hz to 4Khz). However, it is difficult to estimate the absorption that will result from the rear projector room. I modeled this as open space (i.e., high absorption across the spectrum), and this seems to have been fairly accurate since the reverberation time inside the theater sounds as I would have expected.

Room Construction

My two primary goals for room construction are noise isolation and good acoustical properties. Fortunately, conventional home building practices (specifically, drywall over framing) yield very good acoustics for small to moderate size rooms.

My theater is being built in the basement of the house. The basement has a concrete slab which is generally not a favorable flooring material for a theater since it does not provide any low frequency absorption. To improve the acoustics, I had the floor built up with flooring plywood over 2x4 joists. Relatively thin (1/2") plywood is used for the floor to reduce the resonance frequency and increase low frequency absorption. Floor joists are spaced at random intervals through the room to vary the resonance frequencies. Closer spacing is used under higher traffic areas to firm up the floor. Sound absorbing material is used in between the floor joists.

To reduce high frequency absorption from the carpet, vinyl sheeting is placed between the carpet and the pad on the rear shelf.

The walls and ceiling are built using 5/8" drywall on framing which provides excellent acoustic properties (although some surface-applied acoustic treatment is still required for the best sound). My primary concern for the walls and floor construction is reducing sound transmission, both to avoid bothering family members outside the theater and to reduce ambient noise in the theater.

Of the four walls, only one is shared with another living space in the house (two of the other three are outside walls, the other is shared with a storage room). The shared wall is built using double wall construction (two completely independent walls are built with an air gap separating them). This kind of wall construction provides more than 20dB of additional sound isolation compared to a normal stud partitioned wall. The drywall for this wall is mounted on hat channel using resilient sound isolation clips (RSICs - http://www.pac-intl.com) to further reduce sound transmission.

The ceiling also uses 5/8" drywall mounted to hat channel using RSICs. 8" fiberglass batting with a 4" air gap is used between the floor joists. The ceiling is completely sealed to eliminate sound leakage. I had originally planned to use ceiling cans, but decided to switch to low voltage track lighting to avoid the challenges of acoustic sealing around the cans.

Now that the theater is complete, I can assess how well these treatments worked. When movies and television is played at typical volume level, very little sound escapes the room. However, for movies with loud bass tracks (such as on movies like Saving Private Ryan), my subwoofers generate sufficient bass energy to cause noticeable rumbling on the floor above the theater.

Acoustic Treatment

Acoustic treatment can be applied to the surface of the walls to modify the acoustics of the space, including adjusting reverberation time, reducing room resonance problems, reducing comb-filter effects, and improving imaging specificity by reducing early reflections.

Sound reflecting off of walls and other objects in the room can reduce detail and imaging specificity. Sound reflections fall into two categories - those that can be distinguished from the original sound and those that can't. Sounds that occur more than 10ms apart can generally be distinguished as separate sounds. Since sound travels at roughly 1100 ft per second, a reflection from a wall that adds 11 ft to the travel distance will fall into this first category. Shorter delays will fall into the second category.

Reflections that can't be distinguished are generally the most harmful to the imaging. This is because these reflections confuse the brain's ability to determine spatial cues from the difference in arrival time to your two ears.  The closer in time the reflection is to the original sound, the worse the problem. This is why refraction off the edge of a speaker cabinet can be so damaging to a speakers ability to image well.

Longer delayed reflections can actually be helpful to creating a sense of airiness to the sound as long as the reflections are not high in energy compared to the original. In most rooms, these reflections will be fairly diffuse once they reach your ears.

The other advantage of taming the first reflections is the reduction of comb filtering. These reflections can also cause constructive and destructive interference at low frequencies which result in peaks and dips in the frequency response. By reducing the amplitude of the coherent reflections, these interference effects are mitigated.

The obvious way to reduce the effect of reflections is to put acoustic absorbing material on the surface of the room. However, too much use of these materials can reduce the reverberation time of the room to the point that the room sounds dead and flat. The alternative is to scatter or diffuse the sound so that only a small portion of the energy from the reflection actually arrives at your ear and the rest is reflected to other parts of the room.

ACOUSTIC TREATMENTS ON SIDE WALL

I am using a small amount of absorptive material (shown as peach colored

rectangles in the diagram above) at the first reflection point on the side walls since this is where the strongest reflections usually occur (since the floor is carpeted, it already has good absorption). The side wall absorptive material consists of 4" thick fiberglass batting set into the wall. Vertical slats are placed periodically between the batting which helps to diffuse the sound reflections within the batting, increasing its absorptive capability (particularly in the mid frequencies).

The wall behind the speakers is acoustically open to the projector room, so the first reflection from the rear wall takes a considerable time to reach the listener.

I had planned to treat the first reflection point on the ceiling with skyline diffusors. A 4'x8' array of these diffusors would scatter reflections off ceiling. I have not yet installed these diffusors and since the room sounds so fabulous without them, I probably will not do this anytime soon.

The side walls beside the listening position are treated with slanted plywood panels. This reduces "slap echo" which is caused from mid to high frequency sounds reflecting back and forth across the room. I've also placed some fiberglass absorption material around the side channel speakers to reduce near wall reflections from these speakers.
The rear wall requires the most treatment since the rear seating is relatively close to this wall. Direct reflections from a close wall can reduce image detail and cause interference effects affecting frequency response.

I did not want to use too much absorptive material on this wall because this might make the room

ACOUSTIC TREATMENTS ON REAR WALL


sound too dead, particularly for those seated in the rear seating positions. Some form of diffusor is the right solution since this will diminish the effect of direct reflections while maintaining a degree of ambiance in the room. I decided to make polycylindrical diffusors which double as bass traps, similar to ASC Tube Trap half-rounds. A polycylindrical diffusor is not quite as effective as a reflection phase grating diffusor (such as those popularized by RPG Diffusors), but it still works well and can be produced at a fraction of the cost and complexity. A total of 16 diffusors, each 15"w x 36"h, are used on the real wall, as shown in the diagram above.

Acoustic treatment can also be used to reduce the effect of room modes. By increasing the absorption of bass energy, the amplitude of frequency response deviations from room modes is decreased, while at the same time spreading out their effect over a wider range of frequencies.

Much of the bass absorption will come from the room construction. The floor, walls, and ceiling are all designed to be relatively flexible with a low resonance frequency, allowing bass energy to be absorbed and dissipated.

Since the rear seating is relatively close to the rear wall, additional bass absorption in this area will be beneficial at reducing room mode induced bass peaks in the region of these seats. The diffusors are designed to provide bass absorption in the 80-300Hz region which is where many of the room mode problems are likely to occur. Since these diffusors are not terribly efficient bass absorbers, the large number used (16 in my case) is necessary to have a meaningful effect on reducing room mode bass irregularities.

Fabric Wall Covering

I don't particularly like the way acoustic treatments look, so I've decided to use acoustic fabric to cover these treatments. I wrestled with a variety of aesthetic designs for the room and finally decided to just cover all the walls with fabric.

Even though the stretched fabric is reasonably acoustically transparent,

FABRIC COVERING ON WALLS


it can still result in high frequency absorption, particularly if the cloth is mounted away from the drywall behind it. To reduce this effect, all the acoustic treatment will be recessed into the walls so that they are mounted flush with the drywall around them. This way, the fabric can be mounted very close to the walls and acoustic treatments and have the least effect on the acoustics.

I plan to use Guilford of Maine FR701-2511 "Cobalt" and 2511 "Lupin" fabrics.

There are a number of companies that make stretch fabric mounting systems to create this kind of effect.  My local dealer recommends the Snap-Tex system.

Video and Screen

One of the great new technologies introduced in recent years is DLP Projectors (Digital Light Processing). These projectors are smaller, lighter, brighter, and less expensive than CRT projectors, and don't have to be converged. Their two biggest disadvantages (IMHO) are black level and acoustic noise. These problems are slowly being improved in each subsequent generation of the technology. The latest HD2/Mustang based projectors provide very good black levels.

Video projectors (and DLP projectors are no exception) are still fairly noisy even though they are less noisy than early generation projectors. The large amount of heat generated by the bright light source in a small space requires the use of powerful fans. No matter how good the audio system is, this "white noise" will reduce the audio detail resolution. To eliminate this problem, I decided from the beginning to make my theater a rear projection system, to isolate the projector fan noise from the listening positions as much as possible. In this case, the projector is moved behind the screen and a translucent rear-projection screen is used instead of an opaque front-projection screen.

Rear projection, of course, requires that more floor space be dedicated to the theater since the projection room has to be light tight and cannot be used for much else. It is possible to minimize the space requirements for the projector room by using mirrors, but this results in some quality loss. Since I had space available in our basement, I allocated enough space for the projector to project straight onto the rear of the screen.

There are a variety of screens available for rear projection use. I've decided on a 16:9 screen size of 87" x 49". This is essentially a 100" diagonal. I am using a Stewart FilmScreen 100.

Seating

Leather sofas and loveseats are provided for seating for seven people. A 12" riser is used in the rear 100" of the room for the two love seats for a clear line of sight to the screen. Most seats are positioned such that expected head positions are not on even multiples of the room dimensions. This minimizes the effect of room resonances. The only significant exception is the center seat on the front sofa, but this position will provide the best imaging response.

Lighting and Ventilation

Lighting is provided by low voltage cans in the ceiling over each sofa and sconces on the side walls. There is also a rope light mounted under a lip on the riser. All of these lights are on dimmer controls.

Since the theater is a well sealed room, some forced ventilation is required to maintain fresh air. Since there is no equipment inside the theater (other than speakers), relatively little heat will be generated in the room, so little cooling is required. A separate zone on the central air conditioning/heat pump is provided for the theater. The intake vent is mounted over the screen in the front of the room. The exhaust vent is mounted in the floor behind the rear loveseats. Ducting is implemented with flexible fiberglass lined ducts to minimize sound transmission.

Equipment

For my last home theater, I spent a small fortune for near state-of-the-art equipment. When we sold this house, the buyer purchased all the theater equipment with the house, so I now must buy new equipment. For my new theater, I don't plan to get such hi-end gear. Fortunately, with technology advances, particularly with digital equipment, it is now possible to come close to this level of performance for considerably less money. And because I've had much more flexibility in the design of the room itself, I expected the overall experience to be better than that achieved in my previous theater.

Video Projector - Marantz VP-12S2 High Definition DLP Projector. This is one of the first projectors to use Texas Instruments' new HD2/Mustang DLP technology, and Faroudja's DCDi video processing. The previous generation projector (VP-12S1) is excellent and this projector further improves its performance (particularly contrast ratio).

Screen - StewartFilm Filmscreen 100, 100 inch diagonal 16:9 rear projection screen.

Main Speakers - Revel F50 speakers. These are the latest speakers to come from Revel, a company I've been very happy with and which has received critical acclaim for their excellent products. The F50s are the high end of Revel's Performa line which are less costly than their Ultima line speakers (which I used for my previous theater). The F50s don't have quite the bass extension available from the Ultima speakers, but in a home theater setting deep bass is the domain of the subwoofer anyway.

Center Speaker - Revel C50 speaker. Matching center channel to the F50 speakers.

Surround Speakers - B&W LM1 speakers. These are small two-way speakers which can be easily mounted to a wall. They provide excellent performance for the money. I'm not a believer in spending a lot on surround speakers and don't believe there is that much value in attempting to perfectly timber-match the surround speakers with the front speakers. These speakers will provide more than adequate performance and can be hidden behind the fabric panels that cover the diffusers on the side and rear walls. I plan to use four of these speakers to implement 7.1 surround.

Subwoofers - Homemade Subwoofer. I had planned to use a pair of Hsu Research TN-1220HO driven by Hsu's 500 watt amplifier. These subwoofers provide deep powerful bass, but after setting them up in my theater, I found they did not have enough power handling capability to fully energize my large room, particularly given the amount of bass absorption I built into the room. I decided my best bet was to build my own subwoofer which is what I've done. This subwoofer is powered by a pair of Bryston 4B-ST amplifiers, providing a total of 1600 watts of power.

Surround Processor Anthem AVM20. This processor has received excellent reviews for providing great performance and flexibility at a reasonable price.

Main Amplifier - Krell FPB-300 2-channel amplifier. This is a 300 watt/channel hi-end amplifier that I currently own. I plan to use it for the front left and right speakers.

Center Amplifier - Krell KAV-250a. To keep the tonal balance as consistent as possible across the three front speakers, I am planning to use another Krell amp for the center channel. This one isn't quite as refined as the FPB-300, but is still quite good and when run bridged, delivers gobs of power.

Surround Amplifier - Anthem MCA 5 5-channel amplifier. This isn't the best multi-channel amp on the market by any means, but it was available used on ebay for about $800 and features balanced inputs. I'm using this only for the four surround channels.

Sub Amplifiers - Bryston 4B-ST. I'm using two of these amplifiers, each of which provides 800 watts when bridged into 8 ohms. My subwoofer has two 8 ohm connections.

Sub Equalizer - Rane PE-17 - I normally don't like equalizers, but they can be very effective in the low bass region to even out room-induced frequency aberrations. The PE-17 is a five-band single-channel parametric equalizer, and all five-bands can cover any portion of the frequency range.

DVD Player - Proceed PMDT DVD Player. This is left over from my previous theater and is being updated with the latest firmware.

HDTV Receiver - Zenith HD-Sat520. Provides terrestrial HDTV reception as well as DirectTV HDTV and SDTV reception. This will be connected to the projector using DVI and to the Anthem and Tivo using S-video.

Personal Video Recorder - Tivo - I modified a standard ver-1 Philips Tivo to include two 80GB hard drives, so it has lots of recording capability. This connects to the Anthem using S-video.

VCR - Something cheap to play the occasional VHS tape.

Cables and Interconnects - Silver Audio Hyacinth balanced interconnects for center and main, Audioquest Coral and Ruby for other interconnects. Audioquest Bedrock speaker cables for subwoofers, Audioquest Mammoth for mains (biwire) and center speaker.

Power Conditioners - Balanced Power Technologies - I'm using three BP-3.5 conditioners - one for the Bryston 4B-ST subwoofer amps, one for the Krell KAV-250a and Anthem MCA5, and one for everything else.

Impressions

Obviously, what counts is how well it works. Well, I'm extremely happy with the way it came out. The sound is fabulous - smooth bass that sounds the same at every seating position in the room; very clear dialog, and beautiful full music sound. The bass from the subwoofers is very deep and tight, but never intrudes when it shouldn't. The music imaging is about as good as I've heard from the Revel F50s, but not as deep, wide, and razor sharp as some of the best speakers I've heard. But for movie soundtracks, this is never distracting.

The image quality is excellent, but lacks the last degree of three-dimensionality, depth of blacks, and ultimate detail of the best projection systems I've seen (Madrigal projector with Snell & Wilcox processor). Of course the cost is approximately 1/10th as much as well. For the money (and even for several times this cost), the Marantz set up for rear projection on the Stewart screen is stunning. Even with the room lights turned up enough for my wife to do her knitting, the contrast, detail and color accuracy are impressive.


Return to Jay Torborg's Main Home Theater Page